
Art, Craft, and Art Educaton Projects
Thursday, April 14, 2016

Saturday, September 26, 2015
Odin Cookie Jar
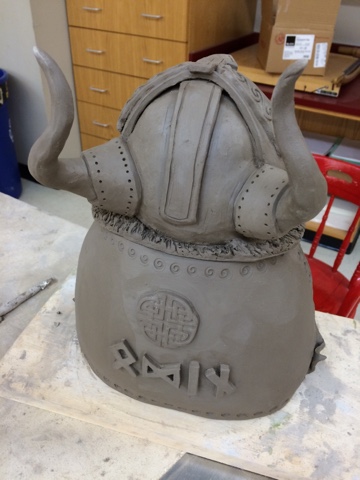

This past week I spent time working on a character jar. I chose to create the Norse God Odin. The character jars I create can be used as cookie jars or canisters for holding dry goods. This piece is still in the greenware stage. It should be dry over the next few days and will be fired and glazed next week.


Saturday, May 10, 2014

Friday, April 25, 2014

Monday, April 21, 2014

Wednesday, March 26, 2014
Etched eggs
I have been experimenting with The Works toilet bowl cleaner as an egg etching agent. It is very quick and the results are beautiful.

Tuesday, December 31, 2013
How I Make Pysanky Eggs
Step 1: Purchase eggs from your local farmer whenever
possible. The less processed eggs yield a better shell. In a pinch, visit your
local supermarket for eggs. I use both brown and white chicken eggs. I also
recommend using medium sized eggs, especially if you must buy from the
supermarket. I have found the smaller eggs are better quality in comparison to
the large and extra-large variety.

Step 2: Check your eggs! Hold each egg up to a light and check the eggs for imperfections, hairline cracks and fractures in the shell. Use the rejected eggs for breakfast!
Step 3: Wash the eggs in dish soap. Try not to handle the eggs with your bare hands from this point on. I wear a plastic disposable glove. The oils in your skin can prevent the dye from taking well on the shell in the areas you touch.


When I give my pysanky eggs to friends and family I package them in the ornament box pictured above. I make these using scrapbook paper and my Cameo Silhouette.


Step 2: Check your eggs! Hold each egg up to a light and check the eggs for imperfections, hairline cracks and fractures in the shell. Use the rejected eggs for breakfast!
Step 3: Wash the eggs in dish soap. Try not to handle the eggs with your bare hands from this point on. I wear a plastic disposable glove. The oils in your skin can prevent the dye from taking well on the shell in the areas you touch.
Step 4: Leave your eggs out to warm to room temperature. Eggs
must be at room temperature before you begin to work on them. A cold egg can
crack when placed in room temperature dye. I leave my eggs out overnight.

Step 5: Time for an additional quick bath! I place each of
my eggs in a vinegar bath for just a few seconds. The vinegar is 50/50 vinegar
to distilled water mixture. This bath will take any remaining oils or
impurities off the surface of the egg and will slightly bite into the shell. I
feel like a vinegar bath helps the shell take the dye better in the next steps.
Step 6: This next step requires drawing guidelines on the
egg for the design. I want to note that not all people draw on their eggs
first. Some just use the wax pen (kistka) and draw directly on the egg without
guidelines. I also use a crafting lathe (as seen in the photo) which is also
not a necessity. The design can be drawn on by hand quite easily. I use the lathe
because it was a thoughtful gift from my son and it makes beautiful perfect
lines. The pencil I use for drawing is a 6H. I use this density of lead pencil
because the soft lead in a number 2 pencil tends to smudge and is difficult to
remove. A number 2 pencil will work in a pinch, just draw lightly!
To divide the egg you can do anything you desire. The following
web site has a lot of interesting egg divisions that are helpful for beginners: PYSANKY INFO. This site has tons of historical information on pysanky. It
is a great resource.

I have divided the egg in half horizontally all the way
around and vertically all the way around.

Continue dividing vertically until you draw 8 lines,
yielding 16 areas as seen above.

Further divide the egg creating the pattern above by drawing
a large X shape across two sections. The X shape will serve as the center from
which I will base the design.

Step 7: While I was drawing the design in pencil, my
electric kistka pen was heating up. If you don’t have an electric kistka, you
can use a traditional kistka and candle. I have those too, but I prefer to work
with an electric pen. I use both clear and black beeswax to draw, depending on
the technique I am seeking. In the photo above you can see what the clear wax
looks like on the surface of a brown egg. It is difficult to see. The black wax
will show up better on the surface. However, if you plan to etch your eggs,
which I will do, I use the clear wax. I have found that the black wax will
sometimes smudge if I plan to leave a lot of the egg shell white. So, plan
accordingly.

The clear wax is applied in the areas I want to keep the egg
its natural brown color.

The photo above shows the difference in appearance in the
clear and black wax after it is applied to the surface of the egg.

Step 8: This step is optional, and not necessary in pysanky.
It is not a traditional practice to etch pysanky eggs, but recently many
pysanky artists have begun using this technique with great appeal. It provides many new possibilities in achieving various color techniques.
In this step, I will use THE WORKS toilet bowl cleaner to etch the egg. You
must wear a glove to protect your skin when soaking the egg. I also recommend
doing this in an area where drips won’t ruin the table surface. I have one
container with THE WORKS and an additional container of water. I soak the egg
for 8-10 seconds only, rolling it around gently in THE WORKS and then
immediately wash the egg in the water to stop the etching action. THE WORKS
actually eats away the shell, so too much time in THE WORKS and you can easily
ruin an egg. Take extreme care with this step!

Step 9: After etching the egg, I now have a beautiful white
surface to begin to apply color. I dried the egg off thoroughly so the wax will
stick, and I will now draw in the areas on the egg shell that I want to keep
white. The areas I waxed earlier will stay the original brown egg color.
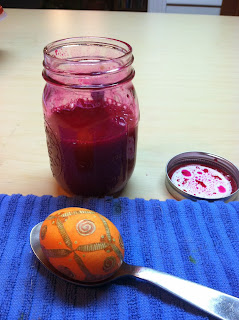
Step 10: After drawing in all areas I want to keep white, I
begin the dying process. In pysanky, the artist begins with the lightest colors
and works their way through the colors of dye to the darkest. Generally, the
order of dyeing is done with yellow first, and then oranges, pinks, blues,
reds, greens and blacks are applied. Depending on the dye you use and the egg
it may take 10 minutes or longer for the dye to set into the egg shell. You can
get all sorts of fun colors by varying the amount of time you submerge the eggs
in dye as well. Experiment and you will see. I left my egg in the yellow for 10
minutes. Then I dried it off and in the next step I will draw again on the egg
to wax the areas I want to stay yellow. Dye and instructions on prepping dye
can be obtained from the suppliers I listed at the end of this tutorial.

Step 11: I have continued to advance through the various
colors, drawing a bit between each color in areas with the wax pen. At this
point, I have areas waxed in yellow and soaked the egg in orange dye. I just
finished drawing to block off the orange areas. I am about to dip the egg into
the pink dye.

Step 12: I continued to progress through orange, pink, and
then scarlet, drawing a bit here and there with the pen. After you are happy
with the colors and have completed your desired design, it is time to remove
all the wax. This is my favorite part, as you will see your design revealed for
the first time. I use several methods for removing wax; each has its pros and
cons. Some people use a candle and hold the egg to the side of the flame to
melt and wipe away the wax. Some people put the oven at 300 degrees and
carefully watch for a minute as the wax melts and then they swiftly remove the
egg and wipe it down. I have lost eggs with each of those methods because they
explode if overheated. Recently I have decided to use an embossing gun (used
for embossing paper) and feel as if this is safer than the other methods.
Either way, I recommend slowly and evenly heating the entire surface of the egg
first. When the entire egg is warm to the touch, carefully focus on heating each
area of the egg wiping away the wax with a towel, old t-shirt, or paper towel
until the entire egg is clean.

Step 13: Now you can enjoy that beautiful design! In the
next step I apply a coat of polyurethane varnish to the top of the egg. Many
people do not do this. Some skip right to the step of blowing the egg, but I
have found that blowing the egg sometimes strips the dye from the shell around
the hole that is poked into the top of the egg. To prevent this from happening,
I varnish the top of the egg first in the area that will become wet from
blowing. The varnish must be left to dry overnight. The varnish I use indoors must
be applied with a brush and requires more time to dry. In the summer when it is
warm outside I use the spray on varnish which dries much quicker. In the photo
you can see I use an upside-down egg carton to prop up the egg to dry. As you
become a pysanky expert, you will have LOTS of egg cartons sitting around the
house.

Step 14: After the varnish has dried on the top half of the
egg it is time to blow out the egg. Some people don’t blow their eggs, which I
have done in the past, only to have eggs randomly explode and fill the house with a potent sulfur stench. I have blown all my eggs since. I use the Blas-Fix kit and a safety
pin. You will need to do this step at the sink.

Begin by carefully poking a small hole into the egg with the
safety pin. I do this because it gives me a nice centering hole for the
drilling step which comes next. It takes practice to do this. Maybe you should
try a few holes on one of the rejected eggs first?

Next use the small green drill that comes in the Blas-fix
egg blower kit to slowly, and with very little pressure, drill a tiny hole in
the top of your egg.

Last, use the blower and carefully poke it into the tiny
hole at the top of the egg. I move it around inside a bit to break up the yolk.
Then follow the package instructions to blow and rinse the egg in the sink.

Step 15: Almost done! Last, I dry the egg and turn it upside
down to drip any remaining water inside the egg out onto the egg carton below.
Since it is now upside-down I varnish the bottom and let it dry overnight. Now we have a finished pysanky egg!

When I give my pysanky eggs to friends and family I package them in the ornament box pictured above. I make these using scrapbook paper and my Cameo Silhouette.

My kiddo makes pysanky eggs too!
Subscribe to:
Posts (Atom)